
“What even is this thing, Vagrant?”, you might have asked yourself, while searching for information before stumbling on this post.
Strap yourself, and enjoy the ride, while I try to explain this amazing piece of tooling :D!
What does it solve?
Although it’s not that new and shiny anymore, it solves an array of problems related to environment incompatibilities, the ones that cause the “oh, but it works on my machine” phenomena.
Everyone, at some point has gone through such a situation, when your build works just fine, but your colleague struggles with some bizarre `composer install`, a behemoth of an `npm i` error, or he/she might not even had redis, or imagick or whatever mission-critical tool installed on their machine.

True to life representation of development pain.
The cause for such problems might be different, ranging from OS incompatibilities, to interpreter version differences. Besides that, the production machine has its own setup, where such an issue can cause consequences after an update.
To avoid this sort of situations, a unified work and runtime environment is required. Here comes into play Vagrant.
How does it achieve that?
Virtual machines.
By using a separate OS inside the host Operating System, one can achieve full flexibility by decoupling the project assets and tools from the global ones. The role of Vagrant in this equation is to manage the process of creation, provision, sync and access to these virtual machines.
Vagrant uses an array of providers, which spawn the VMs.
- Virtual Box, the most popular one
- HyperV ( available on Windows )
- Docker
and some other plugin-based providers, such as
- Parallels ( available for Mac )
- VMWare

Basically what happens 😀
Where to get it?
As a ready packed setup binary it’s available on the official website, here: https://www.vagrantup.com/downloads
If you like package managers, here are some some examples:
Mac / Brew:
brew cask install vagrantWindows / Chocolatey:
choco install vagrantUbuntu / Aptitude:
curl -O https://releases.hashicorp.com/vagrant/2.2.9/vagrant_2.2.9_x86_64.deb
sudo apt install ./vagrant_2.2.9_x86_64.deb
Once installed, you can run `vagrant –version` to verify the installation.
If it returns something of this format, then you are good to use it!
Vagrant 2.2.9Ok, got it, and how do I run php using it?
The process it quite straightforward once you have Vagrant and a provider installed. In the example below I will be using Virtual Box.
To install Virtual Box, please pull the binary from here: https://www.virtualbox.org/
Or via package managers:
Mac / Brew:
brew cask install virtualboxWindows / Chocolatey:
choco install virtualboxUbuntu / Aptitude:
sudo apt install virtualboxSo, let’s dive:

I have created an empty directory, which will serve as a blank slate for the demonstration.
The main file for any Vagrant installation is the `Vagrantfile`, therefore let’s have it created. We can do that by using the following command on any UNIX based system:
touch VagrantfileThe Vagrantfile contains the configuration of the virtual machine that is to be created. A typical configuration contains the
- Base machine image – the platform on which the box will be built on. Usually a variation of a distro, the most popular ones are for Ubuntu and Debian.
- Network configuration – how the VM communicates with the outer world, which address and ports its opening, port re-assigning
- File sync config – which tool to use for sync ( usually nfs or rsync ) and which files to watch for
- Provisioning config – which script to run on the box after startup ( and force provisioning ). It has to contain all the necessary tooling, libs and scripts that have to be present on every instance of the box.
How do I tell the file what and how to use? Easy, in Ruby 😀
In our case, the config for a Debian box, with the routed address to 192.168.33.11, nfs file sync and provision file as provision.sh in the root, will look like this:
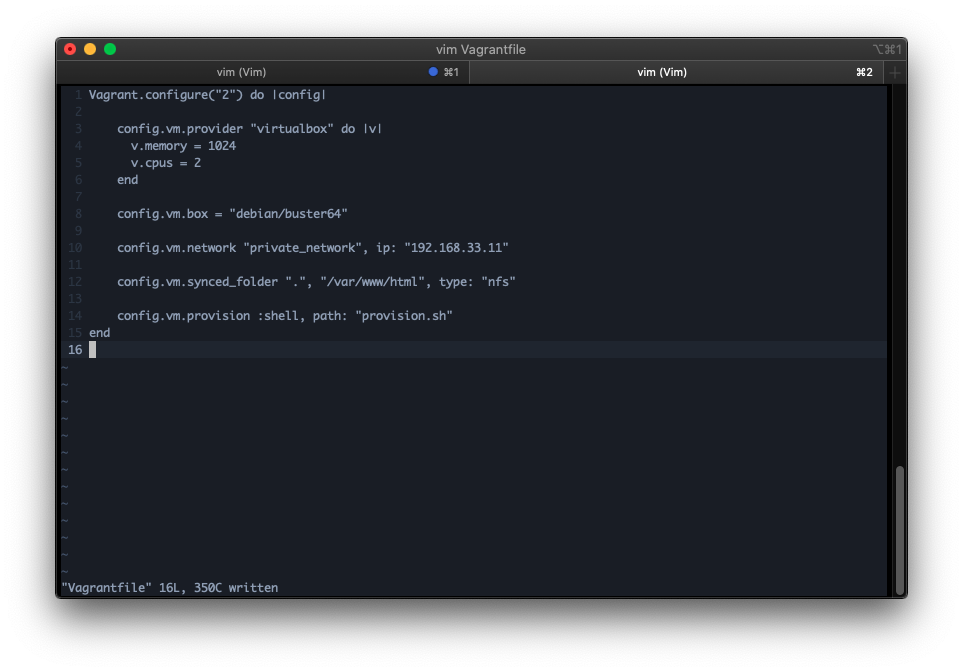
Sample Vagrantfile setup
Step by step, that is what is happening here:
# Sets the vagrant version, for legacy purposes.
# All modern setups use the version "2"
Vagrant.configure("2") do |config|

    # Sets the provider as VirtualBox
    # Configures it to 1GB Ram and 2 Cores of CPU
    config.vm.provider "virtualbox" do |v|
      v.memory = 1024
      v.cpus = 2
    end

    # Pulls the Debian Buster base box
    config.vm.box = "debian/buster64"

    # Sets the host system ip to 192.168.33.11, that's where it points to when sharing anything to 0.0.0.0 internally, so you can access the websites through the host machine.
    config.vm.network "private_network", ip: "192.168.33.11"

    # Routes and watches for changes every file from the current directory where the Vagrantfile is located, to the VM's /var/www/html, which by default for Apache shares the files for access on the url above.
    config.vm.synced_folder ".", "/var/www/html", type: "nfs"

    # Runs provision.sh as a shell script. The file is located in this case in the same directory as the file.
    config.vm.provision :shell, path: "provision.sh"
end
The provision.sh file, mentioned at the end of the config, is supposed to contain all the commands needed for the initiation of the application.
For our use case, the required services for a base php app are the server and the interpreter. Without further to do, let’s write that down.
In this example, you can find the setup for Apache and PHP 7.4.
#!/usr/bin/env bash

# Global variable for non-interactive prompt support
export DEBIAN_FRONTEND=noninteractive

# Configure dpkg to work even without an output window
sudo ex +"%s@DPkg@//DPkg" -cwq /etc/apt/apt.conf.d/70debconf
# Hide setup commands, only show echo output
sudo dpkg-reconfigure debconf -f noninteractive -p critical

# update / upgrade
echo "Updating repos..."
sudo apt-get update

# install apache 2.4.38 and php 7.3
echo "Installing apache2..."
sudo apt-get install -y apache2 1> /dev/null
echo "Installing PHP 7.3..."
sudo apt-get install -y php7.3 1> /dev/null
sudo service apache2 restart

echo "Provisioning done :D!"
Once the file is created, you can create the box!
To achieve that, run:
vagrant upIn the same directory in which the Vagrantfile is located. It has to look like this:
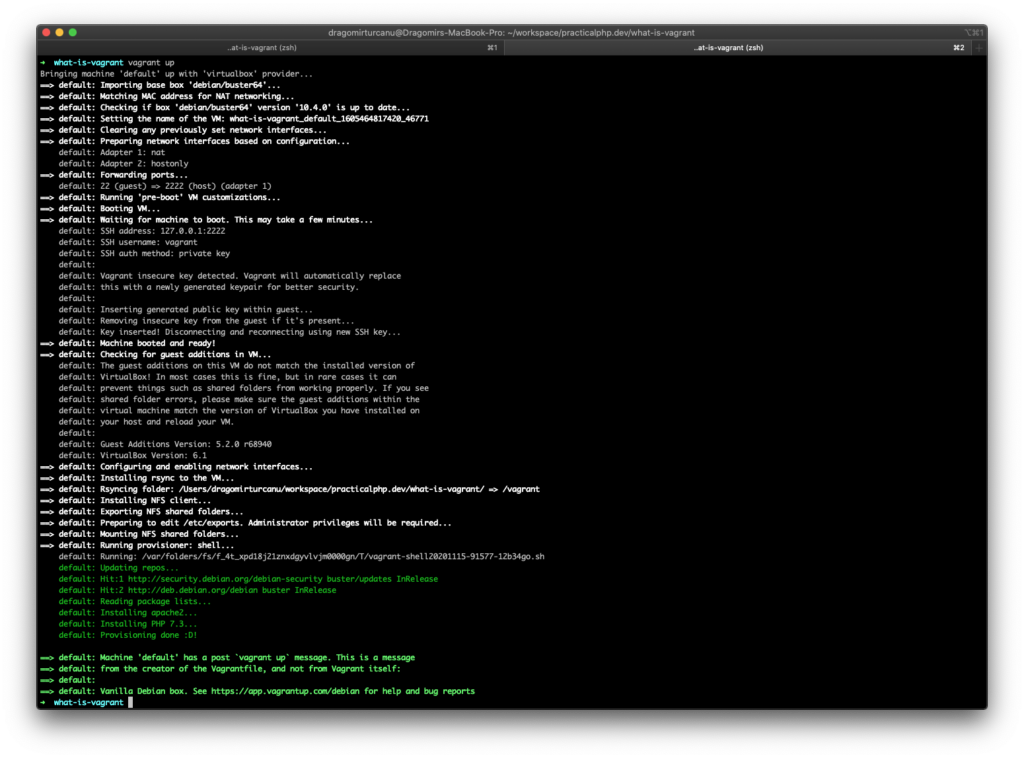
Initial Vagrant up install
Once you’ve got everything up, it’s time to test. Let’s create a demo php file to check if we achieved what we wanted, a.k.a php interpretation inside the VM.
Create a index.php file in the same directory, and fill it up with some sample source code:
<pre>
<?php
echo "Echo demo:";
echo "This is the Vagrant demo!\n\n";

echo "\nLoop demo:";
for($i=0; $i < 10; $i++){
 printf("$d Hi there!\n", $i);
}

echo "\nSort demo:";
$arr = [-6, 2, 34, 6, 1 , 623];
sort($arr);
print_r($arr);
?>
</pre>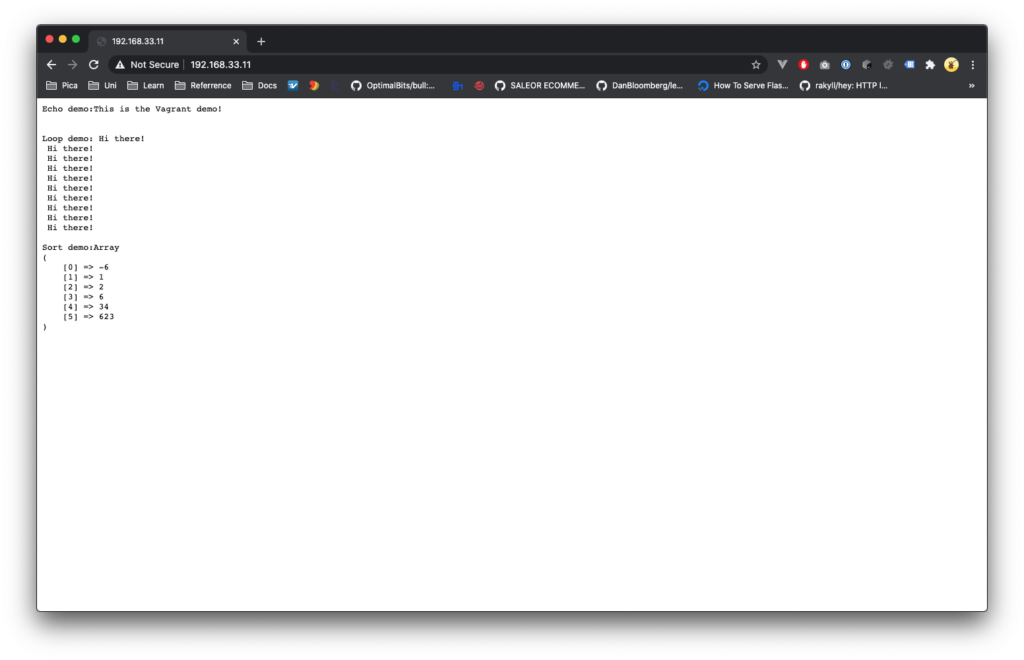
PHP interpretation demo
It works! Now, armed with the knowledge of how to create and provision a Vagrant box, feel free to add any library, package, database and piece of functionality you may desire.
In the next part of this mini-series about Vagrant, I’ll show a configured box for comfortable Laravel / WordPress development, based on this very example showcased above, complete with database, queues and much more!
Thanks for reading!
If you have a suggestion, please feel free to let me know below or on any social media!